Backing up a Playstation 3

So in my efforts to get backups of all my devices/computers and have a copy off site, I ran in to a little problem with the PS3. I went to the local Best Buy and bought a couple Seagate portable 2.5 inch USB 3 hard drives. One was a 1TB one for my PS3 and one was a 2TB one for the PS4. The PS4 immediately started working and backed up. Excellent, however the PS3 had a myriad of �issues. The first issue is that the drive has to be formatted as FAT32 for the PS3 to be able to read/write to it. Well Windows 7 won’t let you format a drive as FAT32, it only supports NTFS and exFAT (the successor to FAT32). While the PS4 can read/write exFAT the PS3 is stuck on FAT32.

Luckily I have some some Mac’s and was able to format the hard drive as FAT32. Now the PS3 recognized it and I thought my problems with the backup were over. So I started the backup and then left it run. I came back a few hours later (as it said it was going to take 4 hours to do the backup) and saw the error “Unable to access the drive.” Well crap, so I thought it was a fluke and tried to start the backup again. This time it went for about 30 minutes or so and then died again with the same error. I tried it a few more times and each time it died at different parts. Since failure is not an option, but it was getting late, I decided to stop for the evening and pick backup the next day.

On the following day I started doing some google-fu and trying to see what other people were doing for backups on the PS3. Everything I had seen I had already done with the exception of one small sentence from one post on a message board. That sentence is what actually fixed my problem. As you would note from above I bought a �USB 3.0 drive (as most are 3 now days vs the 2.) Well this was the actual issue. It appears that the PS3 USB 2.0 ports don’t have enough voltage to power a portable hard drive such as the one I bought. If the drive had external power, I wouldn’t have had the issue. So the solution was to put a powered USB hub in between the PS3 and the USB hard drive. I did that, and presto about 4 hours later the backup was done.


Hopefully this will help other people. As for the formatting of the hard drive in FAT 32, if you don’t have a Mac laying around you can download GPartd (which is a Linux ISO) which you can boot and then format the USB drive. (It is available from�http://gparted.sourceforge.net/livecd.php.)

OpenSSL and Solaris 10

So if you are still running Solaris 10 and haven’t looked at the patches recently, Oracle bundled in OpenSSL 1.0.1 as a patch. While this was awesome to see an updated version, now that everyone should only be running TLSv1.2 on their websites, there are some issues. The main issue is that the GCC version that is supplied with Solaris 10 for what ever reason has /usr/sfw/include and /usr/sfw/lib hardcoded in to the gcc binary as the first Include and Library path. While I can understand why it was probably done to begin with, it makes compiling any software that needs an updated version of OpenSSL completely impossible.

For example say you wanted to compile a new *AMP stack, and wanted the latest version of Apache with SSL enabled. Well, it won’t work. It will by default use the old 0.9.7 OpenSSL libraries and include files. I spent days on this, even compiled my own version of OpenSSL and tried to link against it, still wouldn’t work and kept linking against the 0.9.7 ones..

So how to fix this? Well you could build your own version of GCC, which in and of itself is not an easy task. You also can’t remove the OpenSSL 0.9.7 libraries as there is a lot that depends on it. So if you read the patch notes for the new OpenSSL they give some “recipes” on ways to maybe possibly fix it during compile time. Which for me did not work. So what I ended up doing was this:


  1. In /usr/sfw/include I moved the openssl directory to .openssl. The new 1.0.1 includes are in /usr/include/openssl.
  2. In /usr/sfw/lib I removed the symlink from libssl.so and libcrypto.so. Also did this in /usr/sfw/lib/amd64. This allows those apps that are using the actual libssl.so.0.9.7 to still run, but compile time stuff can’t find them.

Once I did that, I went back to the apache directory and did the compile and yippie, it was against the /usr/lib/libcrypto.so.1.0.1 and /usr/lib/libssl.so.1.0.1, which also meant that I could limit Apache to only use TLSv1.2.


So If this helps just one person, great.. This was something that took me a few �weeks to figure out. I also should have noted that if I had fully read the readme in the patch that introduced OpenSSL it would have probably went a little faster… If you are worried about breaking stuff, once you get your compile done, you can put the symlinks back and move the openssl directory back to it’s original place.

N.B. I am not sure if the gcc in Solaris 11 has the same quirk.

Cash for Cache

I decided to build a new VMware host for my home “lab” last week to replace the HP workstation I had been using. (The real motive was to turn the HP workstation in to a large NAS since it has 12 SATA ports on it, but more on that later.) So off to part out my new server. What I ended up purchasing was the following (Prices as of 3/24/2015 in USD):


The plan was to set this system up with VMware vSphere 6 and then migrate everything from my VMware 5.1 system to this. So I began building it as the parts arrived last friday night. Everything was going swimmingly until I forgot that the LSI2308 SAS/SATA RAID card doesn’t have any cache. What I found was that the 2 480GB SSD drives in a RAID 1 on that card were fast, extremely fast, as in I could boot a Windows 7 or Windows 2012R2 VM in about 3 seconds. However the 2 2TB SATA drives that I made a RAID 1 on there were slow as hell. (Same as the issue I was having with the HPXW8600 system.) I had originally thought it was just the RAID rebuilding, so I left it at the RAID bios over night rebuilding the array.

Well after leaving it at 51% completed and going to bed, waking up 8 hours later and it was only at 63%, I knew that I would never be able to use the SATA drives as a hardware mirror on that device. So I powered it down and disconnected them from the LSI2308 and moved them over to the Intel SATA side of the motherboard. This is where things get interesting, as I really wanted to have a large 2TB mirrored datastore for some of my test vm’s that I didn’t run 24×7 (the ones I do are on the SSD RAID 1.) In order to achieve this I had to do some virtualization of my storage…

The easiest way I could get the “mirrored” datastore to work was to do the following:

  1. Install FreeNAS vm on the SSD drive (pretty simple a small 8GB disk with 8GB of ram, which would leave me 24GB of ram for my other VM’s.)
  2. On each of the 2TB disks, create a VMware datastore, I called them nas-1 and nas-2, but it can be anything you want.
  3. Next create a VMDK that takes up nearly the full 2TB �(or smaller in my case, I created two 980GB VMDK’s per each 2TB disk.)
  4. Now present the VMDK’s to the FreeNAS VM.
  5. Next create a new RAID 1 volume in FreeNAS using the 2 disks (or 4 in my case) presented to it.
  6. Create a new iSCSI share of the new RAID 1 volume.

Now comes the part that gets a little funky. Because I didn’t want the iSCSI traffic to affect my physical 1GB on the motherboard I created a new vSwitch but didn’t assign any physical adapters to it. I then created a VMkernel Port on it and assigned the local vSphere host to it with a new IP in a different subnet. I then added another ethernet (e1000) card to the FreeNAS VM and placed it in that same vSwitch and assigned it an IP in the same subnet as the vSphere host.

With the networking “done”, it is now time to add the iSCSI software adapter:

  1. In the vSphere Client, click on the vSphere host, and then configuration
  2. Under Hardware, select Storage Adapter, then click Add in the upper right.
  3. The select the iSCSI adapter and hit ok. You should now have another adapter called iSCSI Software Adapter, in my case it was called vmhba38.
  4. Click on the new adapter and then click Properties
  5. Next I clicked on the Dynamic Discovery tab and clicked Add.
  6. In the iSCSI Server address I ended the IP address I made on the FreeNAS box on the second interface (the one on the “internal vSwitch”)
  7. Click ok (assuming you didn’t change the port from 3260)
  8. Now if you go back and click Rescan All at the top, you should see your iSCSI device.
  9. Now we just need to make a datastore out of it, so click on Storage under the Hardware box
  10. Then Add Storage…
  11. Then follow through adding the Disk/LUN and the naming stuff.

You should now have a new iSCSI datastore on the 2 disks that were not able to be “hardware” mirrored. Using HD Tune in a Windows 7 VM on that datastore I got this:
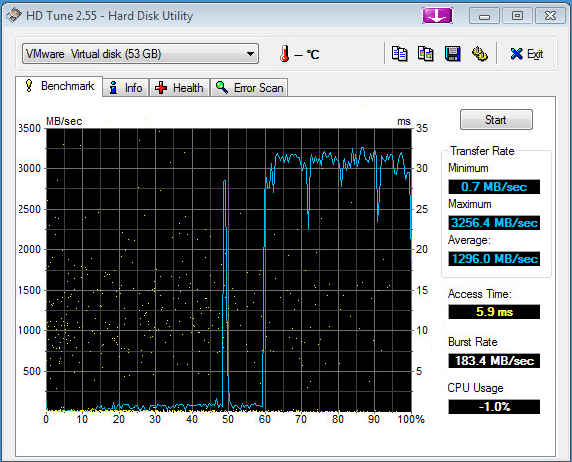
HD Tune running in Windows 7

As you can see, the left side of the huge spike was actually the writing portion of the test, which got drowned out by the read side of the test. Needless to say the cache on the FreeNAS makes it read extremely fast. As an example a cold boot of this Windows 7 VM took about 45 seconds to get to the login screen from power on. However a reboot is about 15�seconds or less..

Now on the FreeNAS side here is what the CPU utilization looked like during the test:
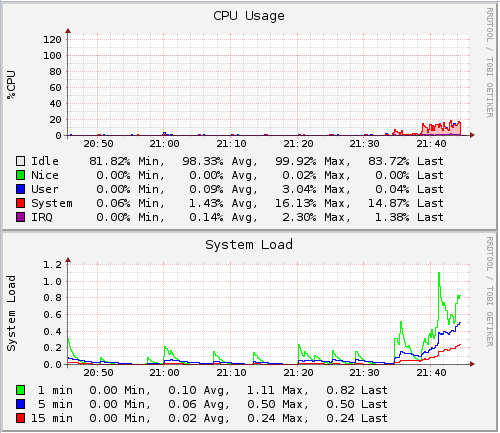
FreeNAS CPU usage

You can see that is barely touched the CPU’s while the test was running. So lets look at the disk’s to see how they dealt with it:
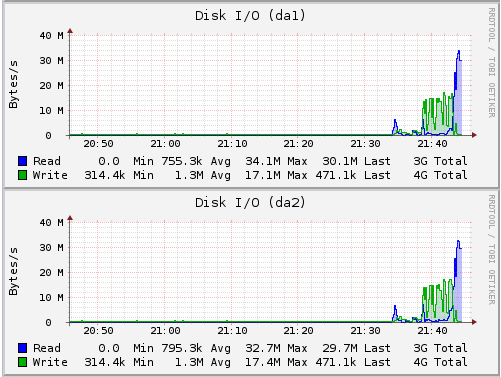
FreeNAS disks

It looks like the writes were averaging around 17MB/s, which for a SATA/6Gbps drive is a little slow, but we are also doing a software raid, with cacheing being handled in memory on the FreeNAS side. The reads looked to be about double the writes, which is expected in a RAID 1 config.

The final graph I have from the FreeNAS is the internal network card:
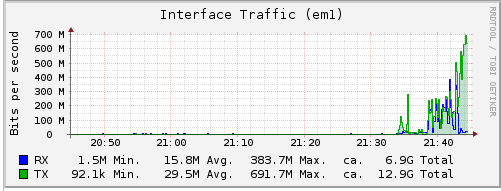
FreeNAS Network

Here we can see the transfer rates appear to be pretty close to that of the disk side. This is however on the e1000 card. I have yet to try it with the VMXNET3 driver to see if I get any faster speeds or not.

While the above may not show very “high” transfer speeds, the real test was when I was transferring the VM’s from the HP box to the new one. Before I created the iSCSI datastore and was just using the straight LSI2308 RAID1 on the 2x 2TB disks, the write speed was so bad that it was going to take hours to move a simple 10GB VM. After making the switch, it was down to minutes. In fact the largest one I moved, was 123GB in size and took 138 minutes to copy using the ovftool method.

So why did I title this post Cash for Cache, quite simple, if I had more cash to spend on a RAID controller that actually had a lot of cache on it, and a BBU, I wouldn’t have had to go the virtualized FreeNAS route. I should also mention that I would NEVER recommend some one doing this in a production environment as their is a HUGE catch 22. If you only have one vSphere host and no shared storage, when you power off the vSphere side (and consequently the FreeNAS VM) you will lose the iSCSI datastore (which would be expected). The problem is when you power it back on, you have to go and rescan to find the iSCSI datastore(s) after �you boot the FreeNAS vm back up. Sure you could have the FreeNAS boot automatically, but I have not tested that yet and to see if vSphere will automatically scan the iSCSI again to find the FreeNAS share.


Looking to the future, if SSD’s drop in price to where they are about equal to current spindle disks, I will likely replace all the SATA hard drives with SSD drives and then this would be the fastest VMware server ever.


Raspberry Pi’ing

Recently I decided I needed a better way to monitor the temperature and humidity in various parts of my house. The main reason was the thermostat for the house is located in a hallway that is more closed in than anything. So while the thermostat may show that it is 75 degrees in the house the rest of the house my only have been 70 degrees or less. After the winter we have had, I also needed a good way to monitor the humidity in the house. The only was I was able to do it was with a little Oregon Scientific thermometer I bought at Target. But the problem with this was it was only for one room, didn’t seem to be very accurate and I had no way of logging the values over a time period.

In comes the Raspberry Pi, along with a DHT22 temperature/humidity sensor and Splunk, I can now monitor, record and graph in realtime the temp and relative humidity in various parts of the house (and the outside).

What I got was this:

  1. 3 x Raspberry Pi 2 Canakits from Amazon.com
  2. 5 x DHT22 Digital Sensors from Amazon.com
  3. 1 x DHT11 Digital Sensor from Amazon.com

Now the DHT11, was what I purchased in the first round along with just one of the Raspberry Pi’s. It is not as sensitive as the DHT22’s, but since it was just for the original test it was ok for what I needed. The second round I bought the other two Raspberry Pi’s and the 5 DHT22 sensors.

What I intend to do is use some of the pre-existing CAT5 runs through the house to wire the DHT22’s in to and then have the other end of the CAT5 runs connect in to a Raspberry Pi in the Garage. This way I can do multiple sensors on one device versus having a device in every room.


Some of the benefits of getting the Raspberry Pi Canakits I got are:

  1. A clear case is included with the correct cut outs for the raspberry pi.
  2. A USB wifi dongle is included, and the drivers are pre-loaded in the OS.
  3. It comes with a pre-loaded 8GB microSD card.
  4. It comes with a miniature breadboard with a 40 pin cable and breakout board that plugs perfectly in to the breadboard.
  5. Comes with various resistors and led’s and pushbuttons.
  6. Has a HDMI cable included, which made it easy to hook in to my monitor
  7. Various jumper cables for the breadboard


Overall, I would say that the total time to get a base monitor up and running is a few minutes. But this is based of me already having Splunk, the network, dhcp, dns, etc already set up. So I am going to detail the basic steps I used to get it up and running:

  1. Unbox the raspberry pi, place the heatsinks on the two “large” chips on the top side, and then place it in the clear case.
  2. Hook up the HDMI, keyboard, mouse, and WIFI dongle.
  3. Insert to the microSD card
  4. Hook up the USB power cable and watch it boot NOOBS.
  5. Once it is booted, select the Raspbian to install. This probably takes the longest of all the steps to do, as it is expanding the operating system on to the microSD card.
  6. Once this is done, it will reboot and bring up a text based config. I set the hostname, enable ssh, set the timezone and finally set the locale.
  7. At the login prompt, you can log in with the userid pi and the password of raspberry.
  8. Next to set up the network, if you are using the ethernet, then it should already have an IP address if you have DHCP running on your network. If you are using the WiFi dongle, then edit the /etc/wpa_supplicant/wpa_supplicant.conf �file as root and put the following in it:
     network={
    ssid="YOURWIRELESSSSID"
    psk="YOURWIRELESSPASS"
    }

    Where YOURWIRELESSSSID is the SSID of the AP you want to connect to and the PSK value is the password for that SSID/AP. (If you are doing MAC�filtering, you can get the MAC address by running ifconfig -a as root and look at the wlan0.

  9. Once you save the file in the item above, issue the following commands:
    wpa_action wlan0 stop
    ifup wlan0
    ifconfig -a
    
  10. By now if everything is working correctly you should have a IP address and network connectivity. You can use wpa_cli status to verify the network connectivity.
  11. Now that the network is up and running I needed to download some software:
    sudo su -
    apt-get update
    apt-get upgrade
    apt-get install python-dev
    git clone git://github.com/adafruit/Adafruit-Raspberry-Pi-Python-Code.git
    wget http://www.airspayce.com/mikem/bcm2835/bcm2835-1.42.tar.gz
    
  12. Now that we have the software downloaded it is time to do some little compiling:
    tar -zxvf bcm2835-1.42.tar.gz
    cd bcm2835-1.42
    ./configure
    make
    make install
    

    That should install the driver for the bcm2835 chip.

  13. Next we need to do the python code setup:
    cd Adafruit-Raspberry-Pi-Python-Code
    cd Adafruit_DHT_Driver_Python
    python ./setup.py install
    
  14. At this point the code should be done. You can now power down (shutdown -h now) the Raspberry Pi and hook in the DHT22 sensors. (Make sure to disconnect the power before connecting the 40 pin cable.
  15. The way I hooked the sensor in for testing was to connect the 40 pin cable to the Raspberry Pi and the other in to the breakout board which was attached to the mini breadboard. Once that was done I hooked a jumper from 3.3 V to the first pin on the DHT22. Then placed a 10K resistor between another 3.3V connection and the second pin. In addition a jumper was ran from GPIO4 to the second pin of the DHT22. The third pin is left unconnected and the forth pin is connected to Ground. I will post a picture later.
  16. Once everything is connected, power the Pi back up and log in and switch to the root account.
  17. Next to see if everything is working change in to the Adafruit-Raspberry-Pi-Python-Code/Adafruit_DHT_Driver_Python directory.
  18. Then run python ./Adafruit_DHT.py 22 4. The 22 is the type of the sensor, so if you are using a DHT11 use 11, if a DHT22 use the 22. The number 4 is the GPIO port that the sensors data pin is connected to. Once you run it you should see something like this:
    root@rpi2:~/Adafruit-Raspberry-Pi-Python-Code/Adafruit_DHT_Driver_Python# python ./Adafruit_DHT.py 22 4
    using pin #4
    Temp = 20.2999992371 *C, Hum = 40.4000015259 %
    
  19. In the above, we can see that the Temp is 20.29C and the Humidity is 40.40%. If you want the Temp outputted as Fahrenheit, like I did, make a copy of the Adafruit_DHT.py file (for a backup) and then add a new line at line 37 with the following:
    tf = (( t * 9 ) / 5.0 ) +32;
    

    Then on line 39, you will want to change the *C to *F, and then in the format(t,h) you will want to change the t to a tf, so the line would look like this now:

    print("Temp = {0} *F, Hum = {1} %".format(tf,h))
    
  20. Now if you re-run, it will look like this:
    root@rpi2:~/Adafruit-Raspberry-Pi-Python-Code/Adafruit_DHT_Driver_Python# python Adafruit_DHT-f.py 22 4
    using pin #4
    Temp = 68.1800006866 *F, Hum = 40.0 %
    
  21. Now that we have the data being output in the format we like, the only thing left was to log it. What I did was create a shell script that is run by cron every minute (* * * * *) and it outputs the values to a log file called /var/log/temp+humid.log. This log file is then pulled in by Splunk for graphing and other fun stuff that will be another post.
  22. The script I wrote looks like this:
    #!/bin/bash
    PATH=/usr/local/sbin:/usr/local/bin:/usr/sbin:/usr/bin:/sbin:/bin
    export PATH
    RESULTS="`python /root/TempLogger/Adafruit_DHT-f.py 22 4 | grep Temp `"
    TEMP="`echo ${RESULTS} | awk '{print $3}'`"
    HUMID="`echo ${RESULTS} | awk '{print $7}'`"
    DATE="`date \"+%Y-%m-%d %H:%M:%S\"`"
    echo "${DATE} ROOM=FamilyRoom TEMP=${TEMP} RH=${HUMID}" >> /var/log/temp+humid.log
    
  23. The output that gets logged looks like this:
    2015-03-17 21:44:02 ROOM=FamilyRoom TEMP=68.1800006866 RH=39.7000007629


Some times, and I haven’t figured out why yet, it will log null values for the TEMP and RH. I need to add some more checking in to the script to make it more robust, but for now it is working.

In the next post I will cover what I do with the data in Splunk, and how I get the outside temps from the local airport and add them to Splunk as well.

Subversion on Solaris

So I have been trying to find the “definitive” guide on compiling and installing Subverison on Solaris. There are random sites over the interwebs that have a spattering of different tips, so I thought I would write one how how I did it and what all was done. When you finish this, you will have a basic Subversion system up and running to which you can then further lock down… Requirements: I downloaded the following:

  1. Subversion 1.8.10 (http://mirror.metrocast.net/apache/subversion/subversion-1.8.10.tar.gz)
  2. APR 1.5.1 (http://mirror.metrocast.net/apache/apr/apr-1.5.1.tar.gz)
  3. APR Util 1.5.3 (http://mirror.metrocast.net/apache/apr/apr-util-1.5.3.tar.gz)
  4. scons 2.3.0 (http://prdownloads.sourceforge.net/scons/scons-local-2.3.0.tar.gz)
  5. Serf 1.3.7 (http://serf.googlecode.com/svn/src_releases/serf-1.3.7.tar.bz2)
  6. Apache HTTPD 2.2.27 (http://mirror.metrocast.net/apache/httpd/httpd-2.2.27.tar.bz2)
  7. SQLite 3.8.6 (http://www.sqlite.org/2014/sqlite-autoconf-3080600.tar.gz)
  8. ViewVC 1.1.22 (http://viewvc.tigris.org/files/documents/3330/49347/viewvc-1.1.22.tar.gz)
  9. diffutils 3.2 (http://ftp.gnu.org/gnu/diffutils/diffutils-3.2.tar.gz) [ Needed for ViewVC to work ]

Next up is compiling the software. This is the order I did things:

  1. Apache HTTP Server
  2. APR
  3. APR-Util
  4. SQLite
  5. scons
  6. serf
  7. subversion
  8. viewvc
  9. diffutils

I put all the tar balls in a directory called svn in my home directory. So all the instructions below are relative to it.


Apache HTTP Server

cd httpd-2.2.27
./configure --prefix=/opt/svnweb --with-ssl=/usr/sfw --with-ldap --enable-mods-shared="ssl deflate rewrite ldap authnz-ldap dav dav-fs dav-lock"
make
make install


APR

cd apr-1.5.1
./configure --prefix=/opt/sungeek
make
make install


APR-Util

cd apr-util-1.5.3
./configure --prefix=/opt/sungeek --with-apr=/opt/sungeek
make
make install


SQLite

cd sqlite-autoconf-3080500
./configure --prefix=/opt/sungeek
make
make install


scons


mkdir /home/unixwiz/scons
cd scons
tar -xvf ../scons-local-2.3.0.tar
ln -s /home/unixwiz/scons/scons.py /home/unixwiz/bin/scons

(made sure the link points to a directory in your path)


serf

At line 251 of SConstruct add the following (this is needed to get it to work on Solaris):

env['PLATFORM'] = 'posix'

(it should be directly below the line that says env.Append(LIBS=’m’) in the sunos if statement)

cd serf-1.3.7
vi SConstruct   (edit as above noted)
scons APR=/opt/sungeek APU=/opt/sungeek OPENSSL=/usr PREFIX=/opt/sungeek CC=/usr/sfw/bin/gcc CFLAGS=-D__EXTENSIONS__
scons install

The CC and CFLAGS needs to be set otherwise it will try to use CC and will give you some errors about APR_PATH_MAX.


Subversion

cd subversion-1.8.10
export CFLAGS=-D__EXTENSIONS__
./configure --prefix=/opt/sungeek --with-apr=/opt/sungeek --with-apr-util=/opt/sungeek --with-serf=/opt/sungeek --with-apxs=/opt/svnweb/bin --with-openssl --with-sqlite=/opt/sungeek
make
make install
cd /opt/sungeek/libexec
cp mod* /opt/svnweb/modules

Next edit the httpd.conf and add the “LoadModule dav_svn_module modules/mod_dav_svn.so” line after the rewrite_module line.

At the bottom of the httpd.conf add the following: (assuming that /svn is the location of your svn repository.)

<Location /svn/repos>
DAV svn
SVNPath /svn>
</Location>

Then change the User/Group from daemon to webservd. Also make sure to change the file systems permissions on /svn to be owned by webservd:webservd.


swig-py

cd subversion-1.8.10
make swig-py
make install-swig-py
echo /opt/sungeek/lib/svn-python > /usr/lib/python2.6/site-packages/subversion.pth


ViewVC

 
cd viewvc-1.1.22
./viewvc-install 

Installation path: /opt/sungeek/viewvc-1.1.22
DESTDIR path: empth

Edit the /opt/sungeek/viewvc-1.1.22/viewvc.conf and change the following:
svn_roots = svnrepos: /svn
default_root = svn_roots
mime_types_files = /opt/svnweb/conf/mime.types
diff = /opt/sungeek/bin/diff


Next copy the files form /opt/sungeek/viewvc-1.1.22/bin/cgi/*.cgi to /opt/svnweb/cgi-bin

Add the following to the bottom of the httpd.conf

<Directory /opt/sungeek/viewvc-1.1.22>
Order Allow, Deny
Allow from All
</Directory>

diffutils

cd diffutils-3.2
./configure --prefix=/opt/sungeek
make
make install