I have always loved all the aspects of TV. When I was younger, I had bought some antennas and placed them in my parents attic to pick up all the Over the Air channels that I could. I remember spending countless nights surfing all the RF channels trying to see what I could pick up when there was a DX type event. I think the furthest away I got was a few hundred miles on a DX skip and picking up channels from Canada, which was pretty cool. Now days it is so much harder as if you don’t have a good signal you have nothing. I much prefer the analog days of scanning for TV stations as even if there were snow you could usually make out the station ID’s.
Fast forward a few decades and I still have the interest in TV/Video. I love making videos and editing them, I also still try to set up an antenna every once and a while to see what I can pick up over the air. But unfortunately where I live the only thing I can usually get is the local PBS station. (I do get some brief signals on others, but not enough for the tuner to lock in on what it actually is.) So with my hobby of doing TV I was surprised to find the SatLink ST-7000 on Amazon. Previously I had talked about the VeCOAX Minimod 2 HD RF modulator. I still use it for my security cameras, but this SatLink intrigued me as it was almost half the price of the VeCOAX one. So I picked it up.
To my surprise, it works very well, I almost want to say better than the VeCOAX Minimod 2. I didn’t have any of the issues with 1080p on the SatLink and it works on nearly all the TV’s in my house. (The one issue I do have is on my Samsung 4K tv, the audio cuts out for like half a second every minute or so. This is super odd and caused me to set there changing configs on it for over an hour one night, when it was just that TV, and all the other TVs in the house it works fine on. Even ones that are older than the Samsung 4K. So I am going to assume it is a firmware issue with the TV, but they haven’t release an update for it in years… Yeah tech waste.)
So how does this make my own TV station? I am sure if you are reading this, you have probably seen other people on YouTube talking about making their own TV station in the house with a Raspberry Pi and an analog modulator. I too started with this, but was not satisfied with the picture quality on the HDTV’s. (Yes I understand it is analog, but now finding the SatLink, I wanted to kick it up a notch.)
To start with I hooked a Raspberry Pi 4b up to the SatLink and set the resolution on the graphical display to be the 1080p and verified that all the TV’s (sans Samsung 4k) it worked on. This was great. Then I started playing a video with VLC full screen, this too work, after I got the audio set to go out the HDMI output. So now I have a basic “TV Station” where I can play a file and have it be on channel 9.1 on all TV’s in the house. But this was not good enough.
What is going to follow is a series of more posts on the scripts and other items I am working on to make it an actual TV station for the house. Scheduling of playing TV Shows and Movies, as well as bumper plates between the shows to show what is coming up and a log of what was shown and when.
With thousands of hours of TV Shows and Movies that I have bought over the years, I could technically cancel my cable TV and have enough to watch for a few years. But what this TV Station does is bring back the “old days” where you watch what was on TV even if you only got one station. It just so happens that this station is mine and it only shows what I want it to show.
Today I was troubleshooting issues with a brand new MacBook Air that had the latest version of macOS Catalina on it. The user had installed Skype for Business but the microphone would never work. In the instructions that Microsoft provides, it says that you need to enable it in the Privacy & Security settings, however the Skype for Business Application never shows up under the Microphone settings. This went down a few rabbit holes, but what it appears is that Microsoft has not updated the Skype for Business app to update the TCC database. So what I ended up having to do was the following:
First you need to give the Terminal app full disk access, if you don’t do this, then the rest of the actions will fail. To do this, while you are in the Security and Privacy Preference Panel, find the “Full Disk Access” on the left side, once found click the lock icon to unlock if it isn’t unlocked already and then select the check box next to the Terminal application. It may give you a popup about needing to quit the terminal app because it is open, go ahead and quit the application.
Next, open a new terminal app, it is under Applications -> Utilities -> Terminal
In the Terminal app, we are going to run 2 commands, the first command is going to backup the file we will be changing with the second command. So the first command we need to run is:
4. Then we are going to run the following command which will insert a new row in to the TCC.db file (this should all be on one line):
sudo sqlite3 ~/Library/Application\ Support/com.apple.TCC/TCC.db "insert into access VALUES('kTCCServiceMicrophone','com.microsoft.SkypeForBusiness',0,1,1,NULL,NULL,NULL,'UNUSED',NULL,0,1541440109) ;"
5. Now go back to the Privacy & Security Preference Panel and click the Microphone, the Skype for Business app should show up there, as well has have a check mark next to it, if it doesn’t have the check mark, click it.
6. Then we need to remove the full disk access from Terminal, so scroll back to the Full Disk Access and uncheck the Terminal application. It will give you a popup about it running, go ahead and click the quit now.
7. Now you can either start Skype for Business, or stop and re-open it and the Microphone should work on voice calls now.
Two days ago I received a letter in the mail from Comcast stating that they were changing the plan that I was on. Currently I had the “Total Premium” plan, which basically meant I receive every single channel along with all the premium channels (HBO, Showtime, Cinemax, etc.) For what ever reason Comcast has decided to remove Cinemax from that plan, claiming that it only shows the same stuff as HBO does. They then stated that they were replacing it with “Hitz” which is an On-demand movie service.
So they are removing 5 Cinemax channels from my bill, and replacing it with an On-Demand service, that I can’t use. See last month they decided to drop the “aging server” that was used by TiVo to provide On-Demand service to TiVo customers who only rent cable cards from Comcast. Wow I thought, not only am I losing 5 Cinemax channels, I am also not going to see a decrease in my bill, and I won’t be able to use the new On-Demand service because they removed that as well.
Now I was pretty pissed, and started thinking about dropping Comcast and going with something else for TV. My first thought was Dish Network. That stopped pretty quickly when I found out that Dish Network doesn’t have HBO on it (nor Cinemax), as they appear to be in a fight with AT&T (HBO’s new owner).
I then thought about just cutting the TV side and doing a streaming only. I started looking at PlayStation Vue, which had HBO and Showtime and what I thought was every channel I wanted, in addition it was the only one with a DVR service. So I signed up for a free trail. Once I started playing with it, I then noticed that they don’t have any Viacom channels (Comedy Central, MTV, etc). Which was bad, as I love Comedy Central, which meant I would have to go buy a separate subscription for something to just get that channel. Well that thoughts didn’t last long.
As I started flipping around Vue, I found that the picture quality just wasn’t up to my standards. While it was watchable, it was definitely noticeable that it was a streaming vs a linear channel. While watching “The Neighborhood” on CBS whenever there was a darker scene, the compression stood out. This was really bad on my 4K TV, which made it look like a really over compressed station. I often complain about how Comcast keeps compressing stuff down and making pictures pixelate, but this was so much worse.
It also had no difference between running Vue on the AppleTV 4K or the Playstation 4 Pro. I also tried it on a Roku 4k on a different lower end TV that only supports 1080 and lower. It was still very noticeable with the picture being washed out and not as crisp as a linear channel. So I canceled the free trial not even 24 hours later.
Tonight I thought about looking at DirectTV, but then got in to the 2year deal vs final price issues. I have been a Comcast customer for over 16 years, and the price has keep going up and up and up. In fact in the 16 years, my bill has went from $100 a month to $249 with no change in any service, other than Comcast removing channels and occasionally increasing Internet speeds. So looking at switching to another provider and then doing the whole 2 year agreement thing sucks. Especially when usually on the start of year 3 your bill doubles.
Then I thought about maybe downsizing my Comcast TV package to just the basics and signing up for just HBO Go and Showtime Now, well, Comcast fucks you over there too. For one you can’t see what is available in your area until you log in. If you try to do it as not logged in it will tell you that there is service already at your address or give you the option for “new” account as you were moving there. So I logged in and I shit you not, it only gave me 2 options, and both of them was to add their Phone to make a “Triple Play” but I don’t want their phone. So I unchecked the phone option and there was NO way to downsize your plan through their site. By now I am frustrated to hell.
I then decided to complain to Comcast about the issue on Twitter, and as usual they just regurgitate the same thing that was in the letter about how the “Hitz” was going to be so much better. When I told them that I wouldn’t be able to use it because I don’t have their X1 crap box. Their response was: I understand where you are coming from. We made the decision to remove the Xfinity On Demand app from TiVo devices because the platform uses outdated technology that can no longer be updated and is therefore susceptible to security breaches. The decision to remove the feature was made in close consultation with TiVo. In order to continue watching this content, you will need an Xfinity TV Box or a device that can access the Xfinity Stream App (Roku, certain Smart TVs, smartphone, tablet or computer). I will forward your feedback.
That sort of pissed me off, in that it there is no way for me to get a lower bill, and the only way to even use the new service was to increase my bill. (Ironically their Roku app is only free while in beta, they will start charging for every Roku you have the app on once it goes out of beta and they will treat them just like cable boxes, which is pure shit.) In addition I am not one who stream movies on a smartphone, tablet or computer. So it is just the latest FU from Comcast this year.
This just makes me miss the days of Over the air TV (yes I realize it is still out there, but where I live, I can’t receive anything from Over the Air except for 1 local PBS station) and being able to pick what I want to buy and not having all these different vendors pissing on each other over carry rights for the channels.
I also understand now why people cut their cable subscription and go pirate the TV shows off of the Internet. Then there is all the different streaming services, and if you go subscribe to the individual ones, you would end up paying even more. And don’t even get me started on NetFlix and their fucked up pricing scheme….
So while trying to disable SMB version 1 on my windows machines, I thought what better way than to do it through the registry GPO settings, all machines in one fell swoop. After creating the appropriate registry keys for the machines I thought everything was good. That was until I rebooted. All of the sudden the Workstation service, Netlogon service and DFS Namespace (on my AD Server) failed to start. Nothing I did would start them.
They always gave an error about not being able to start because the group failed to start. I debugged this for days, and finally thought that it was just the one AD box had become corrupted. So I seized all the roles by my other server and then built a new AD and added it to the forest. Well as soon as I rebooted the new FSMO master, it started having the problems the first one did.
By now I was mad. So what was the issue, well, when I created the Registry keys and pushed them I mistakenly set mrxsmb to disabled, instead of mrxsmb10. So on the machine that was broke, I pulled up regedit and set mrxsmb to be enabled and mrxsmb10 to be disabled. I then removed the entries out of the GPO registry entry and then rebooted the machine. This time it booted and Workstation, Netlogon and DFS Namespace all started.
Lately I have been doing a lot of learning about PostgreSQL and how it can be used to replace other databases, such as Oracle RDBMS, MySQL, etc. One of the things that I have been looking to most recently is how to make PostgreSQL highly available. In Oracle you would use RAC, however in PostgreSQL you have streaming replication, but that only leaves for a single master server and technically an unlimited number of slaves. In reality most web based applications these days are 90% read and about 10% write so having tons of slaves for read-only queries is awesome, but what if your master goes down?
That is where Patroni comes in. Patroni is a framework that handles the auto failover of the master instance of PostgreSQL between multiple servers. However Patroni alone won’t do this for you, you will need some other software as well. The other two pieces of software that I used was etcd and haproxy. etcd will be the quorum system and haproxy will be the “load balancer” so that your applications only have to have one hostname to point to.
As a small example setup, I used 3 machines running PostgreSQL 10, 1 machine running etcd and one machine running haproxy. What the rest of this post will be about is setting up the different machines and software on them.
How to setup Centos 7 + PostgreSQL 10 + Patroni
All Machines Software Installs:
The first thing to do is install CentOS 7, fully patch it and record the IP address of each machine if they are on DHCP. I used the minimal install so there wasn’t a lot of extra software on the machines.
PostgreSQL 10 Servers:
For all the PostgreSQL servers the following packages will need to be installed: gcc, python-devel, epel-release
yum install -y gcc python-devel epel-release
After you have those installed (in particular the epel-release one) you can install the following : python2-pip
Once you have that RPM installed you can install the following packages: postgresql10-server postgresql10
yum install -y postgresql10-server postgrseql10
etcd server:
The following packages needs to be installed on the etcd server: gcc,python-devel, epel-release
yum install -y gcc python-devel epel-release
After epel is installed, you can then install etcd:
yum install -y etcd
haproxy server:
The following packages are needed on the haproxy server: epel-release and then haproxy.
yum install -y epel-release
yum install -y haproxy
Software Configuration
Postgresql Servers
Now that the software has been installed, it is time to configure the components. (Everything here is ran as root)
We will start with the PostgreSQL Servers, mine are named pg01 (10.0.2.124), pg02 (10.0.2.125), and pg03(10.0.2.126) respectively. The following needs to be done on each of the 3 servers:
Next we are going to create a systemd service for patroni. So edit the file /etc/systemd/system/patroni.service to contain the following:
[Unit]
Description=Runners to orchestrate a high-availability PostgreSQL
After=syslog.target network.target

[Service]
Type=simple

User=postgres
Group=postgres

ExecStart=/bin/patroni /etc/patroni.yml

KillMode=process

TimeoutSec=30

Restart=no

[Install]
WantedBy=multi-user.targ
Next create a /etc/patroni.yml file. This file will control the startup/shutdown, etc of the postgres instance. Here is an example of mine from my pg01 server. In it, you will need to replace IP addresses for your own servers and usernames and passwords.
Now lets move on to the etcd server. The only thing on the etcd server that needs edited is the /etc/etcd/etcd.conf file. Here is what I changed in mine:
Some of the above lines may be commented out, if so uncomment them and replace the values.
HAProxy Server
Now to config the HAProxy Server. Replace the /etc/haproxy/haproxy.cfg with the following:
global
        maxconn 100
        log     127.0.0.1 local2

defaults
        log global
        mode tcp
        retries 2
        timeout client 30m
        timeout connect 4s
        timeout server 30m
        timeout check 5s

listen stats
        mode http
        bind *:7000
        stats enable
        stats uri /

listen postgres
        bind *:5000
        option httpchk
        http-check expect status 200
        default-server inter 3s fall 3 rise 2 on-marked-down shutdown-sessions
        server postgresql_pg01_5432 10.0.2.124:5432 maxconn 100 check port 8008
        server postgresql_pg02_5432 10.0.2.125:5432 maxconn 100 check port 8008
        server postgresql_pg03_5432 10.0.2.126:5432 maxconn 100 check port 8008
N.B. The logging setup in the haproxy config requires that you set up rsyslog to allow logging to local files and to local2.*
Starting it all up
So assuming that I haven’t missed anything above, and there are no typo’s on my or your part, we can start starting things up. But first some notes. Something in SElinux breaks some of this and I haven’t had enough time to look in to it, so disable SElinux for now (setenforce 0). In addition I did not add any ports to the firewalld, as this was just a test setup, so I disabled the firewall on all 5 machines. You can leave it enabled and then using the configs above add the appropriate ports to be allowed between the appropriate machines.
So easy starts first:
Start the etcd server:
systemctl start etcd
Start the haproxy server:
systemctl start haproxy
Now for the PostgreSQL servers there are a few things to do before we start them. On each PostgreSQL host do the following:
Now we can start Patroni and see if everything works. When you start Patroni, it will start PostgreSQL in the background and create the first database and set the username and password for the postgres user to what you specify in the /etc/patroni.yml file.
systemctl start patroni
On the first host that you start Patroni on if you run systemctl status patroni you should see that it is running and active. In the /var/log/messages you should see something like :
Sep 2 19:53:08 pg01 patroni: 2018-09-02 19:53:08,628 INFO: Lock owner: pg01; I am pg01
Sep 2 19:53:08 pg01 patroni: 2018-09-02 19:53:08,636 INFO: no action. i am the leader with the lock
When you start the two slaves you should see something similar to this in the /var/log/messages:
Sep 2 19:54:17 pg02 patroni: 2018-09-02 19:54:17,828 INFO: Lock owner: pg01; I am pg02
Sep 2 19:54:17 pg02 patroni: 2018-09-02 19:54:17,829 INFO: does not have lock
Sep 2 19:54:17 pg02 patroni: 2018-09-02 19:54:17,836 INFO: no action. i am a secondary and i am following a leader
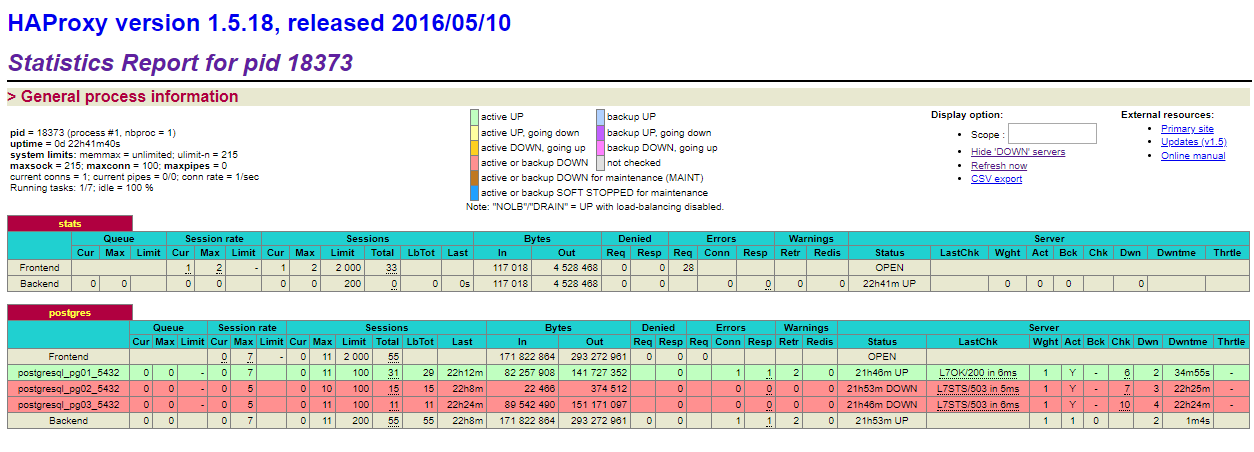
Now if you switch to the web interface of HAProxy you should see something like this:
haproxy web interface
What this image shows is that the pg01 server is the active master server. If you were to shut down pg01, then one of the other two will become the new master and remain the master until you either promote another server or the new master goes down.
Now that everything is running, you would point your clients to the haproxy address on port 5000.
Closing Comments
While this describes how to setup an HA Environment for PostgreSQL, there are 2 single points of failure with this example setup. One is the etcd server, which should be clustered, the other is the haproxy which should be clustered as well. In addition I didn’t cover setting up read-only slaves which I may do at some point in the future.