Cash for Cache

I decided to build a new VMware host for my home “lab” last week to replace the HP workstation I had been using. (The real motive was to turn the HP workstation in to a large NAS since it has 12 SATA ports on it, but more on that later.) So off to part out my new server. What I ended up purchasing was the following (Prices as of 3/24/2015 in USD):


The plan was to set this system up with VMware vSphere 6 and then migrate everything from my VMware 5.1 system to this. So I began building it as the parts arrived last friday night. Everything was going swimmingly until I forgot that the LSI2308 SAS/SATA RAID card doesn’t have any cache. What I found was that the 2 480GB SSD drives in a RAID 1 on that card were fast, extremely fast, as in I could boot a Windows 7 or Windows 2012R2 VM in about 3 seconds. However the 2 2TB SATA drives that I made a RAID 1 on there were slow as hell. (Same as the issue I was having with the HPXW8600 system.) I had originally thought it was just the RAID rebuilding, so I left it at the RAID bios over night rebuilding the array.

Well after leaving it at 51% completed and going to bed, waking up 8 hours later and it was only at 63%, I knew that I would never be able to use the SATA drives as a hardware mirror on that device. So I powered it down and disconnected them from the LSI2308 and moved them over to the Intel SATA side of the motherboard. This is where things get interesting, as I really wanted to have a large 2TB mirrored datastore for some of my test vm’s that I didn’t run 24×7 (the ones I do are on the SSD RAID 1.) In order to achieve this I had to do some virtualization of my storage…

The easiest way I could get the “mirrored” datastore to work was to do the following:

  1. Install FreeNAS vm on the SSD drive (pretty simple a small 8GB disk with 8GB of ram, which would leave me 24GB of ram for my other VM’s.)
  2. On each of the 2TB disks, create a VMware datastore, I called them nas-1 and nas-2, but it can be anything you want.
  3. Next create a VMDK that takes up nearly the full 2TB (or smaller in my case, I created two 980GB VMDK’s per each 2TB disk.)
  4. Now present the VMDK’s to the FreeNAS VM.
  5. Next create a new RAID 1 volume in FreeNAS using the 2 disks (or 4 in my case) presented to it.
  6. Create a new iSCSI share of the new RAID 1 volume.

Now comes the part that gets a little funky. Because I didn’t want the iSCSI traffic to affect my physical 1GB on the motherboard I created a new vSwitch but didn’t assign any physical adapters to it. I then created a VMkernel Port on it and assigned the local vSphere host to it with a new IP in a different subnet. I then added another ethernet (e1000) card to the FreeNAS VM and placed it in that same vSwitch and assigned it an IP in the same subnet as the vSphere host.

With the networking “done”, it is now time to add the iSCSI software adapter:

  1. In the vSphere Client, click on the vSphere host, and then configuration
  2. Under Hardware, select Storage Adapter, then click Add in the upper right.
  3. The select the iSCSI adapter and hit ok. You should now have another adapter called iSCSI Software Adapter, in my case it was called vmhba38.
  4. Click on the new adapter and then click Properties
  5. Next I clicked on the Dynamic Discovery tab and clicked Add.
  6. In the iSCSI Server address I ended the IP address I made on the FreeNAS box on the second interface (the one on the “internal vSwitch”)
  7. Click ok (assuming you didn’t change the port from 3260)
  8. Now if you go back and click Rescan All at the top, you should see your iSCSI device.
  9. Now we just need to make a datastore out of it, so click on Storage under the Hardware box
  10. Then Add Storage…
  11. Then follow through adding the Disk/LUN and the naming stuff.

You should now have a new iSCSI datastore on the 2 disks that were not able to be “hardware” mirrored. Using HD Tune in a Windows 7 VM on that datastore I got this:

HD Tune running in Windows 7

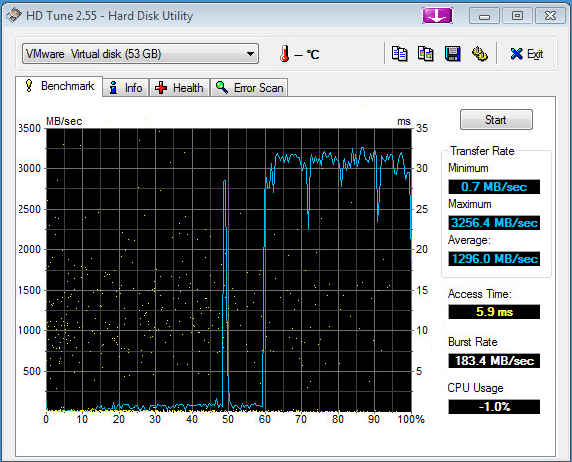
As you can see, the left side of the huge spike was actually the writing portion of the test, which got drowned out by the read side of the test. Needless to say the cache on the FreeNAS makes it read extremely fast. As an example a cold boot of this Windows 7 VM took about 45 seconds to get to the login screen from power on. However a reboot is about 15seconds or less..

Now on the FreeNAS side here is what the CPU utilization looked like during the test:

FreeNAS CPU usage

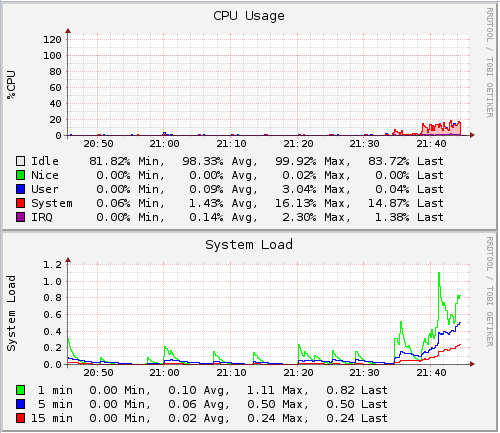
You can see that is barely touched the CPU’s while the test was running. So lets look at the disk’s to see how they dealt with it:

FreeNAS disks

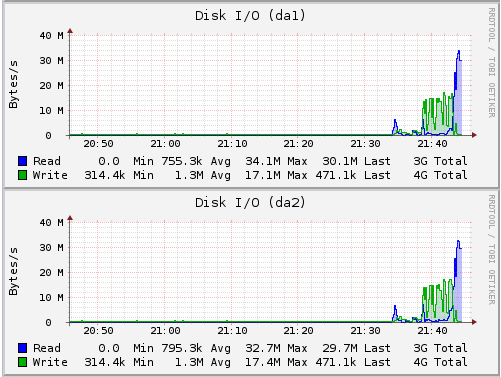
It looks like the writes were averaging around 17MB/s, which for a SATA/6Gbps drive is a little slow, but we are also doing a software raid, with cacheing being handled in memory on the FreeNAS side. The reads looked to be about double the writes, which is expected in a RAID 1 config.

The final graph I have from the FreeNAS is the internal network card:

FreeNAS Network

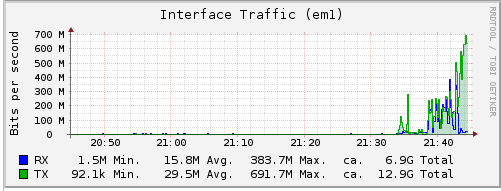
Here we can see the transfer rates appear to be pretty close to that of the disk side. This is however on the e1000 card. I have yet to try it with the VMXNET3 driver to see if I get any faster speeds or not.

While the above may not show very “high” transfer speeds, the real test was when I was transferring the VM’s from the HP box to the new one. Before I created the iSCSI datastore and was just using the straight LSI2308 RAID1 on the 2x 2TB disks, the write speed was so bad that it was going to take hours to move a simple 10GB VM. After making the switch, it was down to minutes. In fact the largest one I moved, was 123GB in size and took 138 minutes to copy using the ovftool method.

So why did I title this post Cash for Cache, quite simple, if I had more cash to spend on a RAID controller that actually had a lot of cache on it, and a BBU, I wouldn’t have had to go the virtualized FreeNAS route. I should also mention that I would NEVER recommend some one doing this in a production environment as their is a HUGE catch 22. If you only have one vSphere host and no shared storage, when you power off the vSphere side (and consequently the FreeNAS VM) you will lose the iSCSI datastore (which would be expected). The problem is when you power it back on, you have to go and rescan to find the iSCSI datastore(s) after you boot the FreeNAS vm back up. Sure you could have the FreeNAS boot automatically, but I have not tested that yet and to see if vSphere will automatically scan the iSCSI again to find the FreeNAS share.


Looking to the future, if SSD’s drop in price to where they are about equal to current spindle disks, I will likely replace all the SATA hard drives with SSD drives and then this would be the fastest VMware server ever.


VMware vsphere and HP XW8600

I last wrote about my VMware home lab back in September, so here is an update. What I have found is that while the HP XW8600 is nice to have all those SAS/SATA connections and the memory, the IO performance is lacking. I currently have 4 SATA drives plugged in to the LSI 1068 Raid card that is on the motherboard. There are 2 1TB drives in a Raid 1, and 2 500GB drives in a Raid 1. But ever since moving to it I have been having really slow IO. As an example last night I was working with a simple MySQL database, it has one table with 2 columns in it. I went to insert 17,000+ rows and it took almost 20 minutes to do it. (On a different server with just IDE drives, it was less than a minute or two do to it.)

So I have been searching most of the weekend to see what I could find, ans there is tidbits of information everywhere on the interwebs. So I thought I would write down what I found and put it in one place for others to find.

It seems that the single biggest problem is “write cache”. Since the LSI 1068 on board raid controller doesn’t have a battery, it has to wait for the disk to report back that the data has been successfully written to the disk. This is complicated by the fact that I have a raid 1 set up, so both disks have to report that it is written and then the controller report back to VMware ok. In other words, there is no “cache” on this controller so the speed is limited to about 20Mb/s.

So how can I fix this? Well since I want the redundancy on the disks, making them single disks, while making it faster would not provide me any security of my data. This could work for a couple of my VM’s that are “disposable” test vm’s. But for ones that I want to keep I would need to keep them on a RAID. So to fix it, I need to find a PCI-E controller that has a cache and battery on it.

So my hunt begins, I will update once I can find one that works well.

Moving VM’s between hosts

About a year ago I purchased a 1U IBM X3550 server to run VMware vSphere 5 on. While it was cool to have a server that had dual quad procs and 8 gig of ram in it, the noise it put off was too much for my family room. (Just think of half a dozen 1 inch fans running at 15,000RPM almost constantly.) Recently I have been spending more time in the family room and the noise has gotten to a level that it is almost impossible to do anything in the room with out hearing it. (Like watch tv, a movie, play a game, etc.) So I started looking at my favorite used hardware site, geeks.com, for a new “server”. Well it finally arrived today, an HP XW8600 workstation. It is another dual quad proc, however it has 16GB of ram, and 12 SATA ports and a larger case, and the best of all, almost absolutely quiet.

So with it installed, I needed to start moving the VM’s from the IBM Server to the HP Server. In an enterprise environment, this usually isn’t a problem as you usually have a shared storage (SAN) that each of the hosts connect to. Well in my little home lab I don’t have shared storage. I did try to use COMSTAR in Solaris 10 to export a “Disk” as an iSCSI target. While this would work, it was going to take forever to transfer 1TB of VM’s from one server to a VM running on my Mac and back to the new server.

So a googling I went, and what I found was a way easier way to copy the VM’s over. ovftool, which runs on Windows, Linux and Mac. What it does is allow you to export and import OVF files to a VMware host. The side benefit of that is that you can export from one and import to another all on one line.

So I downloaded the Mac version and started coping. The basic syntax is like this:


./ovftool -ds=TargetDataStoreName vi://root@sourcevSphereHost/SourceVM vi://root@destvSphereHost

So if one of my VM’s is called mtdew, and I had it thin provisioned on the source host and wanted it the same on the destination host, and my datastore is called “vmwareraid” I would run this:

./ovftool -ds=vmwareraid -dm=thin vi://root@ibmx3550/mtdew vi://root@hpxw8600

where ibmx3550 is the source server and hpxw8600 is the destination server. If you don’t specify the “-dm=thin” then when it is copied over, it will become a “thick” disk, aka us the entire space allocated when created. (I.E. a 50GB disk that only has 10GB in use would still use 50GB if the -dm=thin is not used.)

There are some gotchas that you will have to look out for:

  1. Network configs, I had one VM that had multiple internal network’s defined. Those were not defined on the new server, so there is a “mapping” that you have to do. I decided I didn’t need them on the new server so I just deleted them before I copied it over.
  2. VM’s must be in a powered off state. I tried them in a “paused” state and it did not want to run right.
  3. It takes time, depending on the speed of the network, disk, etc, it will take a lot of time to do this, and the VM’s have to be down while it happens. So definitely not a way to move “production” vm’s unless you have a maintenance window.
  4. It will show % complete as it goes, which is cool, but the way it does it is weird. It will show the % at like 11 or 12 and then I turn my head and all of the sudden it says it is completed.
  5. I did have some issues with a vm that I am not sure what happened to it, but when I try to copy it, I get an error: “Error: vim.fault.FileNotFound”… It may be due to me renaming something on the vm at some point in the past.

Hope this helps some other “home lab user”…


How R-Studio for Mac saved my ass

I have an external Seagate Firewire 800 drive that I use on my Mac Pro that has over 700GB of VMware images on it. Pretty much anything I work on I have an image on there, everything from a Windows XP client to Microsoft Exchange servers, and Solaris, Linux and the such. I have had the drive for a couple of years and it has always been rock solid and fast too. (I bought it when Windows 7 screwed up my internal drives.)

Well today I  was wanting to run a VM off of that drive to test something, and noticed that the drive did not appear on my Desktop. Weird, it as plugged in, the light was flashing, but no icon. Hmm, where the hell did it go? So I unplugged it and plugged it back in. Still no go. So i tried switching power supplies, still no go. Then if I left it sit for a while I would get the error that it could not use the drive, or that it needed initialized. Holy crap, that isn’t good.

I popped up the command prompt, diskutil would list that there was a drive there, but no partitions on it. The gui Disk Utility would see the disk, and again no partitions and wouldn’t let me do anything with it. gpt wouldn’t let me read it. So I thought to my self, did Windows 7 screw the disk up again (it was working the other day when I had booted in to windows, but forgot to unplug it before doing so 🙁 ). So I booted in to Windows 7, it could see the drive but said it was unformatted. Double shit. So back to MacOSX, I went out searching for some data recovery programs. The first one was Data Rescue 3 while the graphics were gimmicky it didn’t even look like the demo version could even see 1 file on the drive. So I uninstalled it and started looking for another program.

In the past I have used the R-Studio for NTFS & FAT and both have worked wonders. I did a google search, and they now have a Mac version.  Now we are talking! So I downloaded the demo, and with in about 2 minutes of starting it, it showed me the entire disk and all the files that were on it. But since it was a demo it would only restore 10 files under 64kb.. So I bought it for $79.99. 2 minutes after buying it, it was busy restoring the files to another external 2TB USB drive. 6 hours later, 100% of my files were restored from the dead firewire drive, and my VM started up just like nothing had happen.  Needless to say it saved me hundreds of hours of reinstalling and setting up my VM environment. Now I just need to go get another drive to make a backup of this one.


So if you are ever needing to restore MacOS, HSFS, NTFS, FAT, UFS, EXT file systems, definitely check out r-tools technology and their R-Studio products. http://www.r-tt.com/  For $79.99 it was more than worth it!


What happens in Vegas, should have stayed in Vegas

Last week, I went to VMworld 2011 in Las Vegas. The conference was great, 20,000+ people all there and focused on one thing, VMware and every product they offer. This was my first time at the VMworld conference, and hopefully will get to go again some time in the future. The main reason I went was because of the recently released vSphere 5 and seeing what all it offered and what all was changed. Needless to say, there are many cool new features that were added, I am only going to mention a few here, but the full list is available in this PDF.

The first cool feature is : Auto Deploy. Simply said, (wish they would have chose a different name) it is PXE boot of the vSphere image from a TFTP server, so no local disk is required to “run” vSphere. For example if you have a “shit ton” of blades and don’t want to have to go update and install all of them, just get their MAC address, setup the host in DHCP with a couple of DHCP options to tell it where to boot from and have the blade boot from the network. It will download the image from the TFTP server and run automagically. Once up and running all config is stored in vCenter 5 (a requirement!). So need to upgrade your hosts? Just reboot them after updating the image. A couple of notes for this, make sure you have logging set up to go to your syslog server, and that you set up the Dump Collector incase of a PSOD.

Another cool feature is: vSphere 5 supports Apple Xserve servers running OS X Server 10.6 (Snow Leopard) as a guest operating system. This is because vSphere now supports UEFI “bios”. Now “supposedly” this does not require Xserve’s (since Apple no longer sells them), but it “requires” them because of Apple’s EULA for use of Mac OS X.

There are many other features that have been upgraded, or are new.. Too bad the conference wasn’t a little longer, as the amount of sessions I wanted to go to were greater than the amount of time I had available to go to said sessions. (I.E. only one instance of a session and 2 sessions I wanted to see were at the same time.)

The Hands on Lab area was “freaking huge”. There were over 800 workstations set up where you could do 1 of 16 LABS (you could do more, just had to stand in line, I was only able to do 1 in the week I was there). Ironically each “lab” station was a Wyse “chubby client” that had dual monitors so you could rdesktop to some windows XP and servers to do the work. The HOL area, sort of reminded me of the CTF area at DefCon, a huge big room, with nearly no light what so ever and hundreds of thousands of screens.

The most interesting part of the conference is that they have grown so big, that next year they have to go to San Francisco to host the event, as there is no place in Vegas that is big enough to house them. This year it was at the Venetian with some spill over to Wynn. They also had the Sands Expo hall, which is connected to the Venetian. The “dining” room was 1.5 million sq ft alone, you could barely see from one end to the other.

I will have to say out of the many conferences I have been to by different vendors, I will have to say so far VMware has been the best. Some of the things that has made it stand out from the rest:

  1. Food, while not “the greatest ever” it was far better than I have had at other places. They gave us breakfast and lunch every day. In addition the break periods between sessions had different items every day. One day they had fresh hot made pretzel sticks with cheese and different sauces.
  2. Hang out area: Most conferences if there is “downtime” you usually end up either walking around or going back to the hotel. VMware set up a “hang space” where they had a basketball court, badmitten court, huge chess sets, fake grass to sit on in front of a big screen (like 20+feet) TV. A Twitter vMeetup place, where you could meet other people that you have met on twitter.
  3. Scheduled sessions. While I was skeptical at first on “pre-registering” for the sessions you want to attend, I think in the end it was a good idea, as it “guaranteed” your spot in the session as long as you showed up 3 minutes before it started. (There were gaps between end and start, so you really had no reason not to be there.)
  4. Group Discussion: in some conferences, I have seen “group discussion” be these “huge” groups where it ends up being a more Q&A session. VMware had group discussions, where there were maybe max 30 people in a room, each one had a clicker, and everyone voted on how the session went and it was a free form for questions. One of the best ones was the Oracle on VMware vSphere one. I learned a lot from that session.
  5. P.A.R.T.Y. : By far the best conference / vendor party I have ever been to. First was the food, you name it, they probably had it. I didn’t realize this till I had already ate a couple of slices of pizza. Then I saw a station where they were making fresh cut cheese-steak sandwiches, another was doing fresh made crab cakes. Like I said, name it, and it was probably there. In addition, a huge open bar (not that I drink, but it was there). So now that we got past the food, they had at least 4 different acts during the night. Two people doing fire tricks, then the openers was Recycled Percussion, which I didn’t realize who they were till I got back to the hotel room that night, but they were on the America’s Got Talent show, and previously had a show nightly in Vegas. The headliners were The Killers. They played for an hour and did all the “popular” songs along with some that I hadn’t heard before.
    This part of the party ended around 9PM. Which was the start time to the “after party” which was at the Venetian pool. I did not go to it, but it sounded like people had a bunch of fun there too.

So if you are still reading by now, you are probably trying to figure out the second part of the title “… should have stayed in Vegas”. Well, it seems that some time either on Sunday or early Monday morning I either sprained or got a stress fracture in my left foot. Needless to say, the 30+miles of walking I did, (cause my hotel was 2 miles away from the conference hotel, it is a damn long walk from Planet Hollywood to the Venetian even if you take the monorail when your foot it hurting like a Mofo) did not help it any. By the time I got home it was still hurting and I noticed that the top of my foot started to have some swelling and bruising. I just iced it on Saturday and Sunday, but as of today it was still hurting and didn’t seem to change much, so I ended up going to the doctor to have it X-ray’d. They said it didn’t show any fractures, but thought it was just a really bad sprain or a damaged ligament. So it is more ice, and a ankle air cast for a while. So that is what I “wish that it should have stayed in Vegas.”