Blades and the true hidden cost

So as you may know by now, I am not a fan of “blade” technology, and rather despise it. One reason is that they simply are not as “powerful” as some larger systems. So what is this “true hidden cost”. What hardware vendors won’t tell you is that, while they think that their hardware is powerful and “compact form”, is that software vendors will almost rape you on the license cost. So lets look at a good example.

Say you are building a “cloud” (another word I absolutely hate, as it is just a buzz word some one made up, because “network” sounds so simple) for your company. You decided to go with the “all mighty blades” as that is the “current buzz” amongst the IT industry. So I buy a blade chassis from company X which happens to hold 10 blade’s that each hold 4 processors of 8 cores a piece and 128GB of ram (probably fictitious and not a real world blade). You also plan on implementing a virtualization hypervisor on your blades to build your “cloud”. On top of this hypervisor you will be using multiple different operating systems and various middle-ware. Sounds good so far right, just like any typical “cloud” environment. So now lets look at the pricing:

  • For the virtualization layer, we don’t care about CPU’s, just memory in use. So we have to buy enough licenses to support 10x128GB of ram. Again, not too bad, but as you add blades and/or memory your price goes up.
  • For the OS layer, this seems pretty simple, 1 OS license per Virtual Machine. Probably so far the simplest of all
  • For the middle-ware, now this is where the big bucks come to play. Different vendors license their software in different ways so here are some examples:
  1. Per VM, seems pretty simple, 1 license per VM. Easiest
  2. Per User, probably the second simplest algorithm, assuming you have an easy user base, i.e. all users are internal company users, or all are external users, etc.
  3. Per physical host, the most complex and costly. Why so? Well lets look in to this in more depth.


So in #3 above I mention that licensing middle-ware per physical host is the most complex and costly. Some people may be thinking that I am absolutely crazy by now but hold on to your seats and watch the money start adding up.

Say we have a fictitious product from vendor Y, the licensing of it is $100 per core of physical server, and the vendor of the software does not “recognize” virtualization.  So if we weren’t doing virtualization to license this product on one of our fictitious blades, that product would cost $3,200, as we would have to pay for all 32 cores in the blade. Still not too bad. But here comes the kicker, say that we created a cluster in our hypervisor that contained all 10 of the blades in our chassis. In addition to this, we have determined by usage that to be able to run Y in our environment, we only really needed a VM with 1vCPU and 2GB of ram. In a physical world, if you could find a server with one CPU, then we would only have to pay $100 for this piece of software. In addition if the vendor  Y supported virtualization you would only have to pay $100 to run it. However vendor Y is all about the money, so to run this one software package on your “cloud”, you would have to pay $32,000.

Wow, $32,000 vs $100 is 320% markup because vendor Y doesn’t “support” virtualization. But you are probably thinking, but hold on a second, I know that VM will only run on one blade at a time, why do I have to pay for all 10? Well because your VM has the possibility of running on any of the 10 blades at any given time. So you have to think of it sort of like auto insurance. Say you have 3 cars, but you can only drive one at a time (because you are only one person). But you still have to pay insurance on all 3, because there is a chance that you could drive any of them.

Does this make sense, hell no… But hold on to your seats because it gets even better. The vendor of product Y also make a hypervisor that does the same thing as another companies hypervisor. But the kicker is that if you use vendor Y’s hypervisor which has less features and abilities that vendor Z’s hypervisor, but does nearly the exact same thing (virtualize an OS instance), they will allow you to only pay for the 1vCPU license to run their product. This is just plain wrong, especially when you have already invested in vendor Z’s platform.

So with “cloud” computing being the current wave of IT, why can’t software vendors recognize that nearly 75% or more of most environments are already virtualized or moving to a virtualized “cloud” environment. If they can’t recognize this, then chances are people are going to go else where for their software needs. Because as your “clouds” get bigger the cost is exponential. To see that just use this as an example, the environment above is for a development. Once we go to production, say we have to have 10 chassis of blades, and there is a possibility of that one application running on any one of the 10 blades on any of the 10 chassis. So now instead of $32,000 you end up paying $320,000 for one little application, that only requires a 1CPU machine to run.

But what the hell does this have to do with blades? Well if you used larger hardware, you could decrease the number of physical servers that were in a particular cluster by consolidating even more. In the simplest term building up vs out. As an example say I could replace all 10 chassis of blades with 6 large servers (large meaning that they could hold 512GB of ram vs my max of 128GB of ram that my “blades” do). Now instead of paying for 100 blades with 4 processors of 8 cores a piece I am only playing for 6 servers of 4 processors of 8 cores a piece, a cost of $19,200, or 6% of the cost of using blades.

I leave it to you to see how much you would save by getting rid of your blades …

Changing passwords? lets make it as difficult as we can…

In this day and age of computer hacks and security problems, why do companies make it awkward to change usernames and or passwords? One example of an awkward procedure to change a password is on the VMware vCenter server. If like any good security minded person you have all  your passwords set to expire every 28 days or so, to change the password on the vCenter server you have to do some “command line fu” to change it. Heaven forbid that you have to change the username as well. So how do you do it? Well if you are running vCenter on a Windows 2008 server and connecting to a Oracle server (that actually holds all the data) there are a couple of things you need to do:

  1. Shutdown the vCenter server (disable it in the Services Control panel)
  2. Change the password for your vCenter user in the oracle DB
  3. Now here it the BIG gotcha. On the windows side you have to run a CMD prompt as an admin user. Just clicking on it in the start menu won’t do it. You have to right click on it and do “Run as Administrator”. If you fail to do this, the next step will fail and just piss you off even more. (The reason for this is the username and password are stored in the registry and I guess running cmd as normal user revokes all privs to modify the registry.)
  4. Now go to the location where VMware vCenter is installed and run the vpxd command with either a -p or a -P. If you use the lower case -p it will prompt you for the new database user password. If you use the -P option, right after the P you can put the new password on the command line.
  5. Now you should be able to start back up the vCenter processes.

Now if you need to change the userid, you need to use Regedit and go to :

  • HKEY_LOCAL_MACHINE\SOFTWARE\VMware, Inc.\VMware VirtualCenter\DB (under My Computer)
  • HKEY_LOCAL_MACHINE\SOFTWARE\Wow6432Node\VMware, Inc.\VMware VirtualCenter\DB for 64 bit versions of Windows.

and change #2 to be the new userid.

This is documented in the VMware KB Article : Changing the vCenter database userid and password. But if you don’t pay attention go the run as part, you will spend a lot of time trying to figure it out even if you are logged in as an administrator.


If your password expires in Oracle while vCenter is up and running, it appears to continue to work while it is up. But if you reboot the vCenter server or restart the vCenter processes, it will “hang” and never start. They also need to make their error messages a little more detailed as to why it is ‘failing’ to start.

Why Thin Provisioning is bad

In this day and age everyone is trying to squeeze the last little drop out of every technological advance that they can. One of the technologies that is “big” is called Thin Provisioning. Basic in short terms, thin provisioning is where you tell a computer that you have X GB of disk (usually from a SAN or in VMware) but in reality you only have <X GB of disk backing it. This is big right now in SAN and VMware because enterprise disk is “expensive”. But is it really worth the cost? No!

See the main reason people (SAN or VMware admins) use Thin Provisioning is to “save” disk space. Say you have a server that performs one function and does not really use a lot of disk space, say a DNS server (either virutalized or physical booting from a SAN).  Now most admins usually like to keep all their servers with a standard config. So for the sake of this post, lets say the boot disk for this server is 50GB. Now once the OS and app is installed on it, it may only be using 4 GB of that 50GB disk.

Before thin provisioning that 50GB as far as a SAN admin is concerned is 50GB used. So in comes Thin Provisioning, now the SAN admin says “hey mister computer here is your 50GB disk ;-)” But in reality it only allocates as much space as being used by the server. So now on the SAN instead of a full 50GB “used” only 4GB would be used. Sounds awesome in theory, but what happens when  you add other servers in that same SAN pool (say the pool is 100GB in size). So the server admin gets another “50GB” disk from the SAN, doesn’t realize thin provisioning is in use, so they go on and install that server. Now we have 8GB in use out of the 100GB pool, but in reality all 100GB has been allocated as far as the 2 servers are concerned.

The next part is when the whole process starts to drown. The server admin asks for another disk, this time 200Gb for say a database or code repository server. Well the SAN administrator says “ok here is your 200GB disk ;-)” But put the disk in the same 100GB pool that the other two servers are in because “he knows” you won’t use all “200GB”. We have now over committed disk however the server admin does not know this has happened. Once the third servers OS has been installed (another 4GB) everything seems to be fine, and technically it is because we are only using 12 GB out of the 100GB pool. But in reality the servers are using 300GB of disk, because they are unaware that there is no space issues.

Where the fun starts is when you start loading data in to those disks. Lets say the second server was going to be a small database server, so we load Oracle and create some table spaces. We end up using up about 40 of the 50GB alloted to it. (So now we are up to 48GB of disk used in the 100GB pool). Still technically ok, but with only 52GB free we need to really start worrying about the disks and the servers. The fun begins when we start loading data on to the server with the 200GB disk. Once we get up to 52 GB used in this we have some problems. Basically all the servers will start reporting write errors or other weird issues. The server admin can’t figure out what the problem is because when he looks at the servers he see plenty of “free” space on the servers. When stuff gets really weird is when processes start dying and they won’t start when you try to restart them (maybe they write to a log file, etc). So the first thing the Server admin will try to do is reboot the server. This is where all hell breaks loose…

See when you start rebooting servers it can’t flush out writes to the disk because there is “no” space left to write to. So the file-systems end up becoming corrupted. When the server reboots, it will try to write more to the disk thinking that it has plenty of free space, but again can’t, so stuff starts hanging. So of course a reboot is done again, and again, etc…

So now you start seeing write errors showing up every where on the other servers, and from the looks it may be a SAN issue, like the disk has disappeared. So you call the SAN admin only to find out that you have been thin provisioned.

This my friends is why thin provisioning is bad and should NEVER be used. Yes it may save you some money on disk, but what you save there will be wasted when you have down time rebuilding servers and restoring data.

Windows 7 is naughty

Today I set out to see if Windows 7 would run MS Flight Simulator X any better than Windows XP did. I found that Windows XP on my Mac Pro (Dual Xeon with 10GB of ram) ran very sluggish. Partly because Windows XP (32-Bit) would only recognize about 3.5 Gig of the 10GB of ram that was installed in the machine. So since I recently got a Technet subscription (I seem to have to do a little more Windows stuff now at work, so thought I might as well learn what I have to manage) I downloaded the Windows Ultimate 7 to see how it would perform before going out and buying it. So I did a Time Machine backup of my data on my Mac Pro and then inserted in the Windows 7 disc and hit the “go”. It took a couple of hours to do the install, patch it, update boot camp stuff and install Flight Simulator. Once it was installed I was impressed that it actually performed much better than it did on Windows XP. I could actually turn the graphics stuff up on it and almost run it at 1900×1200 with out any jerking around. I then did a couple of flights and then it was time to boot back in to MacOS to get some real work done. This is when I about lost it..

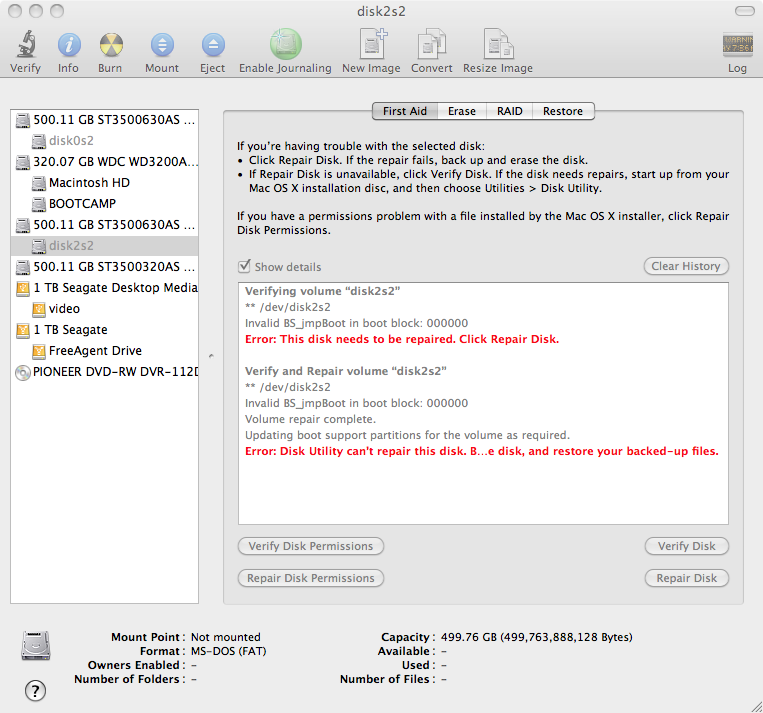
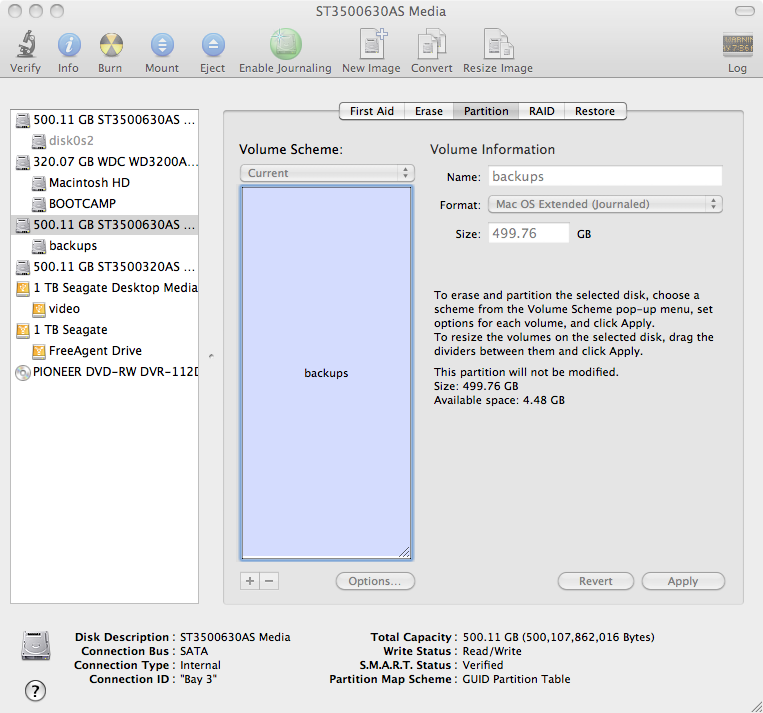
See when I booted windows 7 it had found the other 3 data drives that were all HFS+ drives in my Mac. It decided to assign a drive letter to them all. I went in and un did that as I did not want Windows to touch those drives. I thought all was well, until I booted in to MacOS. When I logged in, it told me that the drives could not be read, and it couldn’t find my home directory (which was one of those drives). I was PISSED! So the first thing I did was pop up the disk utility and this is what I saw (minus the 2 1TB seagate drives):

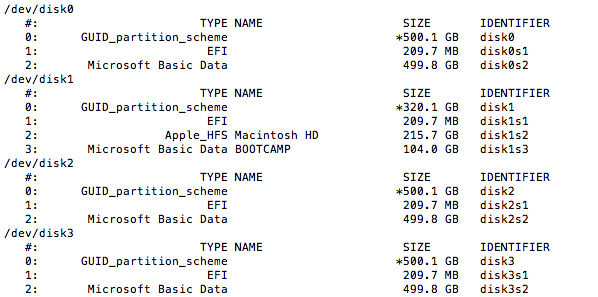
What pissed me off was that every partition I clicked on, it said it was an MS-DOS partition. Surely Windows didn’t screw around and format all my drives.. I was at a loss, all my data was on there, 20,000+ pictures, all the video I was working on, everything… So I decided to see what I could see from the command line. So off to the command line, and I ran the “diskutil list” command and saw this:

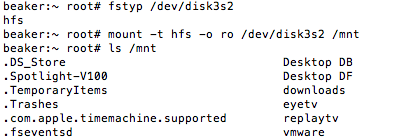
Yup, Micro$oft had screwed with my partitions.. So I was hoping that maybe it just changed the partition type and my data was still there. So I poked around to see if there was a way to change the partition type. In the gui tool, the only way to do it is to “format” it over, which meant I would loose everthing, and I didn’t have any backups, as the disk2 in there was my Time Machine backup drive. So thinking to my Solaris side, I knew there was a program called “fstyp” that would tell you what a particular disk slice was formated as. So I gave it a shot and MacOS has that program:

So I ran the fstyp util againest one of the slices, and it came back saying it was HFS… Hot diggity dog.. Maybe my data is still all there.. So I did a mount on it as readonly and it worked. I could see all the data on the drive. So I immediatly started copying data from the drive to an external USB drive (the first 1TB seagate drive in the picture above). But the problem now was, I had 3 x 500GB harddrives of information. The 1TB drive only had about 400GB free. So off to Best Buy and I picked up a Seagate 1TB Firewire drive. Brought it home and mounted up the other partitions and started copying the data. It has been going on for about 2 hours or more now on the copy. I will say that the Seagate Firewire 800 drive is spanking the ass off of the Seagate USB drive.

Once I have backed up all the data.. (Hint use the ditto command) I will see if there is a way to change the partition type with out reformatting the drive. If there isn’t then I will have to reformat and then ditto the data back on to the Internal drives..

Hopefully this will help some one else if they get the same problem, and it (MacOS) tells you “you must initialize the drive”. DONT. Tell it to cancel and then you can save your data.. If you initialize it, you may end up loosing all your data.

—Update

As I waited for the data to finish copying I decided to test some stuff on my time machine drive. I read a bunch on the GUID labels that are on the disks. Using the gpt command i did a listing of the GUID info for the drive. Using that information I deleted the index 2 and added a new one with the Apple HFS GUID label:

gpt -r show /dev/disk2
gpt remove -i 2 /dev/disk2
gpt add -b 409640 -s 976101344 -i 2 -t "48465300-0000-11AA-AA11-00306543ECAC" /dev/disk2

In the above, you can see I removed index 2. As soon as I did that, this window popped up:

I just selected ignore on it. Then went on to put in the new GUID label which was the third command in the shot above. The numbers (409640, and 976101344) are taken from the line that has index 2 on it above. You MUST use the exact same numbers, otherwise you are going to change the partition size and may corrupt your data. The value after the -t is the GUID value for MacOS HFS (HFS+), which I found on http://en.wikipedia.org/wiki/GUID_Partition_Table, you can also see that the one that was listed before I removed it was a Windows Basic Data Partition.

As soon as I hit enter on the gpt command to add it in, the gui disk utility immediately changed and now showed me my data was there. It also mounted the disk like nothing had happened.

I am going to wait till the copying is done and then do the other two drives and then I should be back to where I was before I installed Windows 7.

More info on the Apple GPT is at : http://developer.apple.com/mac/library/technotes/tn2006/tn2166.html

Ultra Restricted Shell in Solaris

How to setup a readonly environment on Solaris:

If you want to give a specific user readonly access to your solaris machine via ssh, and want to log everything they do, it is sort of easy to setup. Here is a quick step-by-step guide to setting it up.

1. First you will need to chose what restricted shell you want to use. In this case I used bash as I wanted the .bash_history file to contain the exact time every command was run on the system. Since Solaris does not come with the rbash command, the only thing you need to do is make a copy of /usr/bin/bash to /usr/bin/rbash.

2. Make the user’s shell be /usr/bin/rbash, this will make them use the restricted bash shell.

3. Make their home directory owned by root.

4. Make their .profile owned by root

5. Create a .bash_history file and make it owned by that user. This should be the only file in their directory that is owned by the user.

6. Pick a location for your “restricted” binaries to reside. If this user will be logging in to multiple machines and you have a shared file system (say /home) I would suggest making the directory in /home; say /home/rbin.. This way you only have to put /home/rbin in their PATH.

7. Make symbolic links in your restricted binary directory to the binaries you want to run. I.e. ls, ps, more, prstat,passwd and hostname :

lrwxrwxrwx 1 root root 17 Feb 19 20:47 hostname -> /usr/bin/hostname*
lrwxrwxrwx 1 root root 11 Feb 19 19:56 ls -> /usr/bin/ls*
lrwxrwxrwx 1 root root 13 Feb 19 19:57 more -> /usr/bin/more*
lrwxrwxrwx 1 root root 15 Feb 19 19:56 prstat -> /usr/bin/prstat*
lrwxrwxrwx 1 root root 11 Feb 19 19:56 ps -> /usr/bin/ps*
lrwxrwxrwx 1 root root 11 Feb 19 19:56 passwd -> /usr/bin/passwd*

By making these sym links instead of the actual binaries, you do not have to worry if you have multiple platforms that you are going between (i.e. Sparc, x86) and doing custom logic to use the right binary.

8. Create the users .profile with the following in it:

readonly PATH=/home/rbin
readonly TMOUT=900
readonly EXTENDED_HISTORY=ON
readonly HOSTNAME="`hostname`"
readonly export HISTTIMEFORMAT="%F %T "
readonly export PS1='${HOSTNAME}:${PWD}> '

This will make it so they can not change any of the Environment variables. It sets their path to /home/rbin. Sets a inactivity time out to be 15 minutes. Sets the extended history to be on (this logs the time each command was executed in their .bash_history file). And finally sets their prompt and makes it readonly as well.

9. The last thing you need to do is change the permissions on the scp and sftp-server binaries so that the user can not execute them. Otherwise, they would be able to download files and go any where on the server they want. (Restricted shell will prevent them from cd’ing out of their home directory) To do this, I created a group and put my user in it as their primary group. Say the group was called rdonly. Now I do the following:


setfacl -m group:rdonly:--- /usr/lib/ssh/sftp-server
setfacl -m group:rdonly:--- /usr/bin/scp

So the files should show up like this now:

bash-3.00# ls -la /usr/lib/ssh/sftp-server /usr/bin/scp
-r-xr-xr-x+ 1 root bin 40484 Jan 22 2005 /usr/bin/scp
-r-xr-xr-x+ 1 root bin 35376 Jan 22 2005 /usr/lib/ssh/sftp-server

And the getfacl will look like this:


bash-3.00# getfacl /usr/bin/scp

# file: /usr/bin/scp
# owner: root
# group: bin
user::r-x
group::r-x #effective:r-x
group:rdonly:--- #effective:---
mask:r-x
other:r-x

This makes it so when the user tries to sftp or scp in to the machine, it will immediately disconnect them as they don’t have permissions to run those 2 executables.

That is about it. Don’t forget to set their password, make sure it has a policy set on it to be changed often and require a combination of letters, numbers and special characters and that it is at least 8 characters in length.

So now when the user logs in they will see something similar to this:

[laptop:~] unixwiz% ssh unixwiz@fozzy
Password:
Last login: Thu Feb 19 22:10:15 2009 from laptop
fozzy:/home/unixwiz> cd /
-rbash: cd: restricted
fozzy:/home/unixwiz> vi /tmp/test
-rbash: vi: command not found
fozzy:/home/unixwiz> PATH=$PATH:/usr/bin
-rbash: PATH: readonly variable
fozzy:/home/unixwiz> timed out waiting for input: auto-logout

As you can see, it will give you errors if you try to do something that you are not allowed to do. The last line shows the time out message where it closes the connection due to inactivity.

Now if the administrator goes and looks at the users .bash_history file they would see this:

#1235099570
cd /
#1235099577
vi /tmp/test
#1235099587
PATH=$PATH:/usr/bin

The #number is the exact time that the user ran the command below it. The item is the seconds since the epoch…